
Jersey milking cows are a treasure trove. Not only do they produce some of the healthiest A2 milk for drinking, but you also can turn that frothy goodness into other milk products like yogurt and butter. Yogurt is one of our favorite dairy products to make from our jersey cow milk. We have a process we use to ensure it is both safe for consumption and rich in flavor. We share our method later in this blog if you would like to give it a try.
A2 raw milk benefits
Ahhh…a2 milk yogurt. Its versatility is not the only benefit of consuming A2 milk products. A2 milk from jersey milking cows is an amazing source of calcium, protein, and other important vitamins and nutrients. Some of the top reasons to consume A2 milk from jersey milking cows include:
- It builds strong bones. It is all about those high levels of calcium we mentioned. A2 milk has 25 percent (300mg) of your daily value of calcium in just 8 ounces.
- It is protein-rich. Protein is the building block of healthy muscles in the human body. Eating adequate levels of protein helps you maintain muscle mass and promotes healthy muscle growth. A2 milk has 12 percent more protein than regular cow’s milk.
- It is packed with essential vitamins and minerals. With vitamins A, D, and B12, jersey cow milk is nutritionally sound in addition to being downright tasty. It also contains phosphorous, potassium, and riboflavin. When you consume any A2 milk product from jersey milking cows, you are getting 33 percent more Vitamin D, 25 percent more Vitamin A, and 15 percent more calcium than you get from regular cow’s milk.
- It is safer for lactose intolerant individuals. A2 milk consists of A2 beta-casein protein, which is known to produce fewer tummy issues – abdominal cramping, bloating, gas – than regular cow’s milk that contains A1 casein protein.
Benefits of homemade raw milk yogurt vs. commercial
Head to any major grocery retailer, and you are likely to encounter rows upon rows of yogurt choices. Although it comes in pretty packaging designed to entice consumers to buy it, there are some things you should know about store-bought yogurt.
When yogurt is high-quality, like a2 milk yogurt, the human body reaps the rewards from the beneficial bacteria contained in it. Store-bought yogurt can sometimes miss the mark for quality, meaning you may not get any health benefits from eating it. Most commercial yogurt is made from Holstein cow milk. Holstein milk has the lowest protein content of all milk types. Store-bought yogurt also tends to be high in sugar and artificial colors designed to make it taste better and look more appealing.
Making your own yogurt at home from jersey milking cows is a great alternative. Not only is it easy to make, but it also is cheaper than buying commercial yogurt and is more easily digested. Following the steps below, you can make your own delectable homemade yogurt.
Making your own jersey milking cows yogurt
If you have never made your own yogurt before, it can feel intimidating at first. We promise it is one of the easiest things you can do and is well worth the effort. We mentioned earlier we have a specific process we follow to make our own homemade yogurt from our jersey milking cow. Follow along to get the same results we do.
Step #1: Get some fresh raw jersey cow milk
Follow your normal milking routine to get fresh milk from your jersey milking cow. To learn the basics, check out our blog on Jersey Cow Milking 101. You will need at least a half-gallon of milk to make a half cup of yogurt, so plan accordingly.
Step #2: Pasteurize the raw milk (Optional)
NOTE: For our family, we love making raw yogurt, which means we do not pasteurize our milk. There are so many health benefits to doing this IF you are using best practices when caring for your cow and during milking. We usually skip this step and go right to step #3 when we finish milking. At that point, the milk is at a perfect temperature to start the culturing process. However, if you are unsure about using raw milk for yogurt, or your milking practices are not what they should be, then please do not skip this step.
Bring your milk to a temperature of at least 180 degrees. For low-heat pasteurization, bring it to 140 degrees. Keep it at this temperature for at least 30 minutes to complete the pasteurization process. Then, let it cool to a temperature of 107 degrees before moving on to step 3.
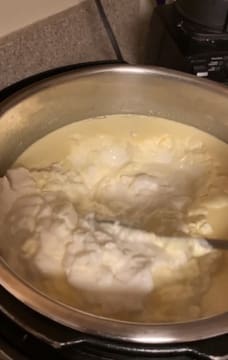
Step #3: Add culture
It is important not to use generic store-bought yogurt as your culture starter. As previously mentioned, they have artificial sweeteners that you will want to avoid in your homemade yogurt. We recommend using plain organic yogurt. Alternatively, you can also get various yogurt starters here. Put one cup into the warm milk and stir it thoroughly. We like to use our instapot for the next part because it has a yogurt setting which makes things super easy. Put your mixture of jersey cow milk and starter culture into the instapot and let it cook until it has a congealed consistency.
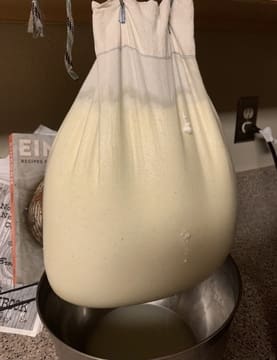
Step #4: Transfer and hang
Once the mixture is congealed, transfer it to Muslin bags and hang them to drain. We use the organic cotton nut milk bag from Cultures For Health. They work amazingly well, much better than free leaf muslin. You can fill, hang and forget them. After the liquid is fully drained, transfer it to a container and refrigerate it. You can use the drained whey protein for other recipes or store it for later use.
That is all there is to making homemade yogurt using jersey milking cows. We would love to see your homemade yogurt creations. Feel free to share them with us in the comments.

Popular Articles


Newsletter
Get signed up to get latest updates and new information from the Jersey Milk Cow!

Why should we pasteurize the milk if we intentionally want it raw to begin with? I understand the slim potential risks of harmful bacteria, but aside from that is it really necessary for the process? Can’t we simply skip that process and go straight to culturing it?
Hi Mark! Thanks for the comment. You definitely CAN do that. In fact that is normally what we do especially when we decide to make yogurt right after milking. The milk is already at an ideal warm temperature right after milking, so starting the culturing process is perfect. Usually we only pasteurize if the milk is cold and need to warm it up, or if we know the milking process wasn’t as clean as we would have liked that morning. Might as well just warm it up to a point where it is pasteurized. I will make an edit to the post to include that information. Thank you!
Can I let the store purchased raw milk raise to room temperature to make yogurt?
Hi David!
Yes, you can use store bought milk to make yogurt. You might have to raise the temperature a bit higher than room temp in order for the culture to take.